Story mapping for ESL lessons
Chris Parker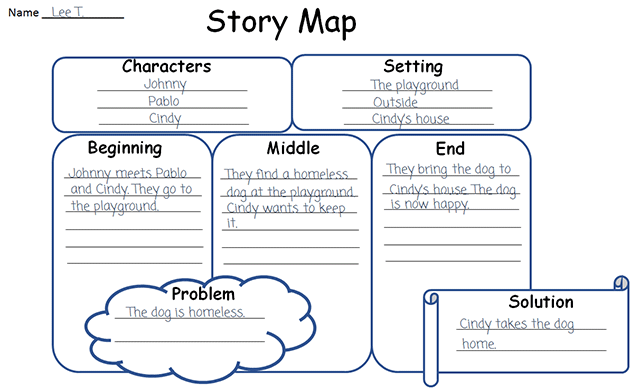
Teaching ESL students how to read, analyze information in stories, and make sense of what they’ve read can be one of the most difficult things you’ll encounter as a teacher. It can be an even more difficult situation for your students, especially when they’re simultaneously learning both English and reading comprehension skills. However, one method that can be particularly effective for both you and your students is story mapping, and in this guide, we’ll be going over what this is and how to apply it to your lessons with success.
What is story mapping?
Story mapping is using graphic organizers, known as story maps, to document and detail the different aspects of a story to improve reading comprehension and retention. When students create story maps, they’re detailing things like the setting, the plot, the main characters, and even more minor details, which can be done both during and after reading a story.
Story maps are usually created by students by filling out a particular type of worksheet known as a story map template. You as the teacher should provide these templates to them and explain the process before delving into a reading activity.
Story mapping templates normally have boxes, circles, or other areas on the page that are designated for specific details. When it comes to which story mapping templates you decide to use for your lessons, you have the choice of either creating them from scratch yourself or sourcing pre-made templates from online and printing them out.
5 steps to applying story mapping
1. Identify suitable reading materials
Your first step in creating a story mapping activity is to identify reading materials that are suitable for your students and this type of activity. Here are some suggestions to keep in mind when doing so:
Consider complexity
Think about your students’ grade level, proficiency levels, and ages when choosing appropriate reading materials, so you’re not choosing something that’s too complex for them. You’ll want to find a mix between something that’s not too difficult for them to understand but that still challenges them a bit so that learning can take place.
Keep things diverse
Once you carry out your first story mapping lesson, you’ll likely use this technique in future lessons, which is why you should always ensure that you’re diversifying the reading materials used. Don’t just provide your students with the same genres, topics, or text types every time, as switching things up every now and then helps to keep their interest.
Adapt when necessary
As a teacher, you’re probably already familiar with the concept of “adopt or adapt,” but if not, adopting is basically using reading materials, lessons, or other things as is without modifying them, while adapting means making modifications as needed. Know your students, know their interests, and know what objectives you’re trying to teach them, and, if necessary, adapt a story by making minor modifications to it so it better aligns with these three things.
2. Create or source story map templates
As previously stated, you can either create your own story map templates or source them from online:
Creating story map templates
If you choose to create your own story maps, you can do this easily in a program like Microsoft Word, starting with a box that you might decide to title “Characters,” where the student will list all the characters’ names from the story as they’re reading it.
Another box might be titled “Setting” where they will detail what setting the story takes place in, and other boxes detailing what happens in the story, such as “Problem” and “Solution,” can also be included.
It’s your choice what each box or area of the worksheet is designated for, as this will be based on what you want your students to remember from the story or what objectives you’re wanting them to learn.
Sourcing story map templates
Rather than create new templates from scratch for your students, you can instead download and print free story map templates from TemplateLAB, a convenient and completely free resource for templates of all types.
While this is one of the more popular sources for templates, there are many more that can be easily found online. You should simply consider what type of story your students will be reading and then find a template that matches whatever objectives you’re aiming to teach them.
Tip for teaching younger students:
If you’re teaching younger students who don’t yet know how to identify things like the setting or plot of a story, you can keep things simple by providing a template that only has boxes for “Beginning,” “Middle,” and “End,” where your students can detail what happens during these different parts of a story.
3. Model how to story map
Instead of simply starting a story mapping activity and expecting your students to know what to do, you should first model the story mapping process for them. Think of this as a practice run before the actual activity, which involves the following steps:
Step #1: Read a story aloud
Choose an appropriate short story to read aloud in front of your students or have everyone read it as a group. This should be a story that’s different from the one you’ll use for your main story mapping activity and short enough to be read in a matter of five minutes or less.
Step #2: Review and discuss
After reading the story, review and discuss the elements of the story with your students and ask questions such as, “Who do you think the main characters of the story were?” or “What was the plot of the story?” These questions should align with the categories shown on whatever story map template you’ll introduce to them in the next step.
Step #3: Model on the board
While you and your students are discussing the story, you should place an example of a story map template in a prominent place, such as creating one on a board or displaying it with a projector or other equipment.
After discussing and identifying particular elements of the story, such as the main characters, the plot, or other details, show your students where those details should be written on the story map template (e.g. writing the character’s names under the “Characters” section on your template).
Step #4: Provide other examples
To make sure your students fully understand the concept of story mapping, you should then provide examples of other types of story maps, where other concepts or details are covered.
4. Carry out the main activity
After modeling how to map out details from a story and ensuring your students understand what to do, you should then distribute another story to them, whether it’s printed on sheets of paper or something found in your students’ books. How long this story should be will depend on how much time you have available in your lesson or how much information you think your students can retain and make sense of.
You should also distribute story mapping templates allow your students to have these on their desks while they’re reading, so they can occasionally glance at them to remind themselves of what details they should be looking for while reading.
You can then read the story as a group with your students or have them quietly read it on their own. After finishing the story, your students should then complete their story maps, and this can be done either separately or within groups, whichever you feel is more appropriate.
While they’re filling out their story maps, you should provide any support they need by letting them know they can ask you questions or by walking around the room to see if anyone needs help.
5. Assess your students’ work
After your students turn in their story maps, you can then assess how well they did by checking each category or section on their story maps to ensure the correct details were written down.
Questions you might ask yourself while assessing:
- “Were all locations in the story properly listed in the “Locations” category?”
- “Did they correctly name each character in the “Main Characters” category?”
- “Does the student have weaknesses in identifying particular types of details?”
Of course, these are just examples, but the point is to ensure that the templates are fully filled out and that you’re going over any mistakes you find with your students while referring back to the story each time when doing so.
Benefits of using story maps
- Boosts reading comprehension – students can see how parts of a story fit together to make sense
- Enhances memorization – writing down details helps students visualize and remember what they read
- Improves language analysis – while identifying details of a story, students notice language patterns
- Leads to English acquisition – English is acquired more quickly with hands-on activities like story mapping
- Adaptable to different lessons – Story maps are versatile and can be used with different text types and genres
Parting advice: use story maps as assessments
Story maps can serve as formative assessments, meaning that you should use them every so often to gauge how well your students are progressing with their reading comprehension skills. As your students become better skilled at reading, you can introduce more complex stories with greater details and more difficult story map templates. You should also always allow your students to take their work home after you’ve assessed it, as they can review it from time to time to keep track of their own progress.
One comment
-
Colette says:
your work is interesting , thank you very much for the contributions